 info@allaroundtexasroofing.com
 Schedule Now
 (469) 598-0899
Filing a roof insurance claim in Texas can feel intimidating, especially after a severe hailstorm, high winds, or a tornado. Between understanding your policy, coordinating inspections, and meeting with the insurance adjuster, it’s easy to feel overwhelmed.
But here’s the truth: when you understand the roof insurance claim process for roof damage, you gain control.
At All Around Texas Roofing, we guide homeowners through Texas roof claims every day. This step-by-step guide breaks down exactly what to expect from the first inspection to final repairs so you can protect your investment and maximize your coverage.
Step-by-Step: How to File a Roof Insurance Claim in Texas
Step 1: Schedule a Roof Inspection First
Before calling your insurance company, schedule a professional roof inspection.
Why this matters:
- You get an independent damage assessment.
- You receive photo documentation and scoping notes.
- You understand the extent of the damage before filing.
- You avoid filing unnecessary claims that could impact premiums.
A roof inspection should include:
- High-resolution photos
- Hail impact documentation
- Wind damage assessment
- Soft metal damage review
- Gutter and siding inspection
- Attic/interior moisture check (if applicable)
This documentation becomes foundational evidence for your claim.
Step 2: Contact Your Insurance Company to Open a Claim
Once damage is confirmed, call your insurance provider’s claims department.
Be prepared to provide:
- Policy number
- Date of loss (storm date)
- Description of visible damage
- Contact information
You will receive:
- A claim number
- Assigned adjuster information
- An inspection appointment date (typically within 1–2 weeks)
Keep detailed records of every conversation, including dates, times, and who you spoke with.
Step 3: Have Your Contractor Present at the Adjuster Meeting
Many homeowners don’t realize this, but you have every right to have your contractor present during the adjuster’s inspection.
This step is critical.
Your contractor can:
- Identify damage adjusters who may miss
- Explain repair requirements in industry terminology
- Ensure code-required items are addressed
- Prevent under-scoping of materials or labor
The adjuster meeting is where the insurance scope of work is determined. Having a knowledgeable contractor present often results in a more accurate estimate.
Step 4: Carefully Review the Insurance Estimate
After inspection, your insurer will issue a written estimate outlining approved repairs and payment amounts.
This document should be reviewed thoroughly with your contractor.
Commonly missed items include:
- Soffit and fascia damage
- Gutter replacement
- Siding damage is not visible from the ground
- Flashing and ventilation component
- Interior water damage
- Code upgrade requirements
- Underlayment replacement
Do not assume the first estimate is final.
Insurance estimates are written based on visible damage at the time of inspection, not necessarily the full repair scope.
Step 5: File a Supplemental Claim
A supplemental claim is submitted when additional repairs are required beyond the original estimate.
Supplements are common and legitimate.
Reasons supplements occur:
- Hidden damage was discovered during the tear-off
- Building code compliance requirements
- Underestimated material quantities
- Incorrect pricing in the original estimate
- Additional trades required (paint, drywall, etc.)
Your contractor provides:
- Updated photos
- Line-item justifications
- Material invoices
- Code documentation
The insurance carrier reviews and issues additional payment if approved.
Step 6: Approve Scope and Begin Repairs
Once the scope is finalized:
- You sign the repair agreement.
- You pay your deductible (as required by Texas law).
- Materials are ordered.
- Repair scheduling begins.
Insurance payments typically follow this structure:
- Initial ACV payment (Actual Cash Value)
- Depreciation release after repairs are completed
- Supplemental payments (if applicable)
Most Texas roof insurance claims take 4–8 weeks from filing to project completion, depending on weather and supplemental approvals.
Understanding Texas Insurance Deadlines
Texas law generally allows one year from the date of loss to file a property damage claim (verify your specific policy language). Waiting too long can result in denial.
If you suspect damage, even minor, schedule an inspection promptly.
Mistakes to Avoid During a Texas Roof Claim
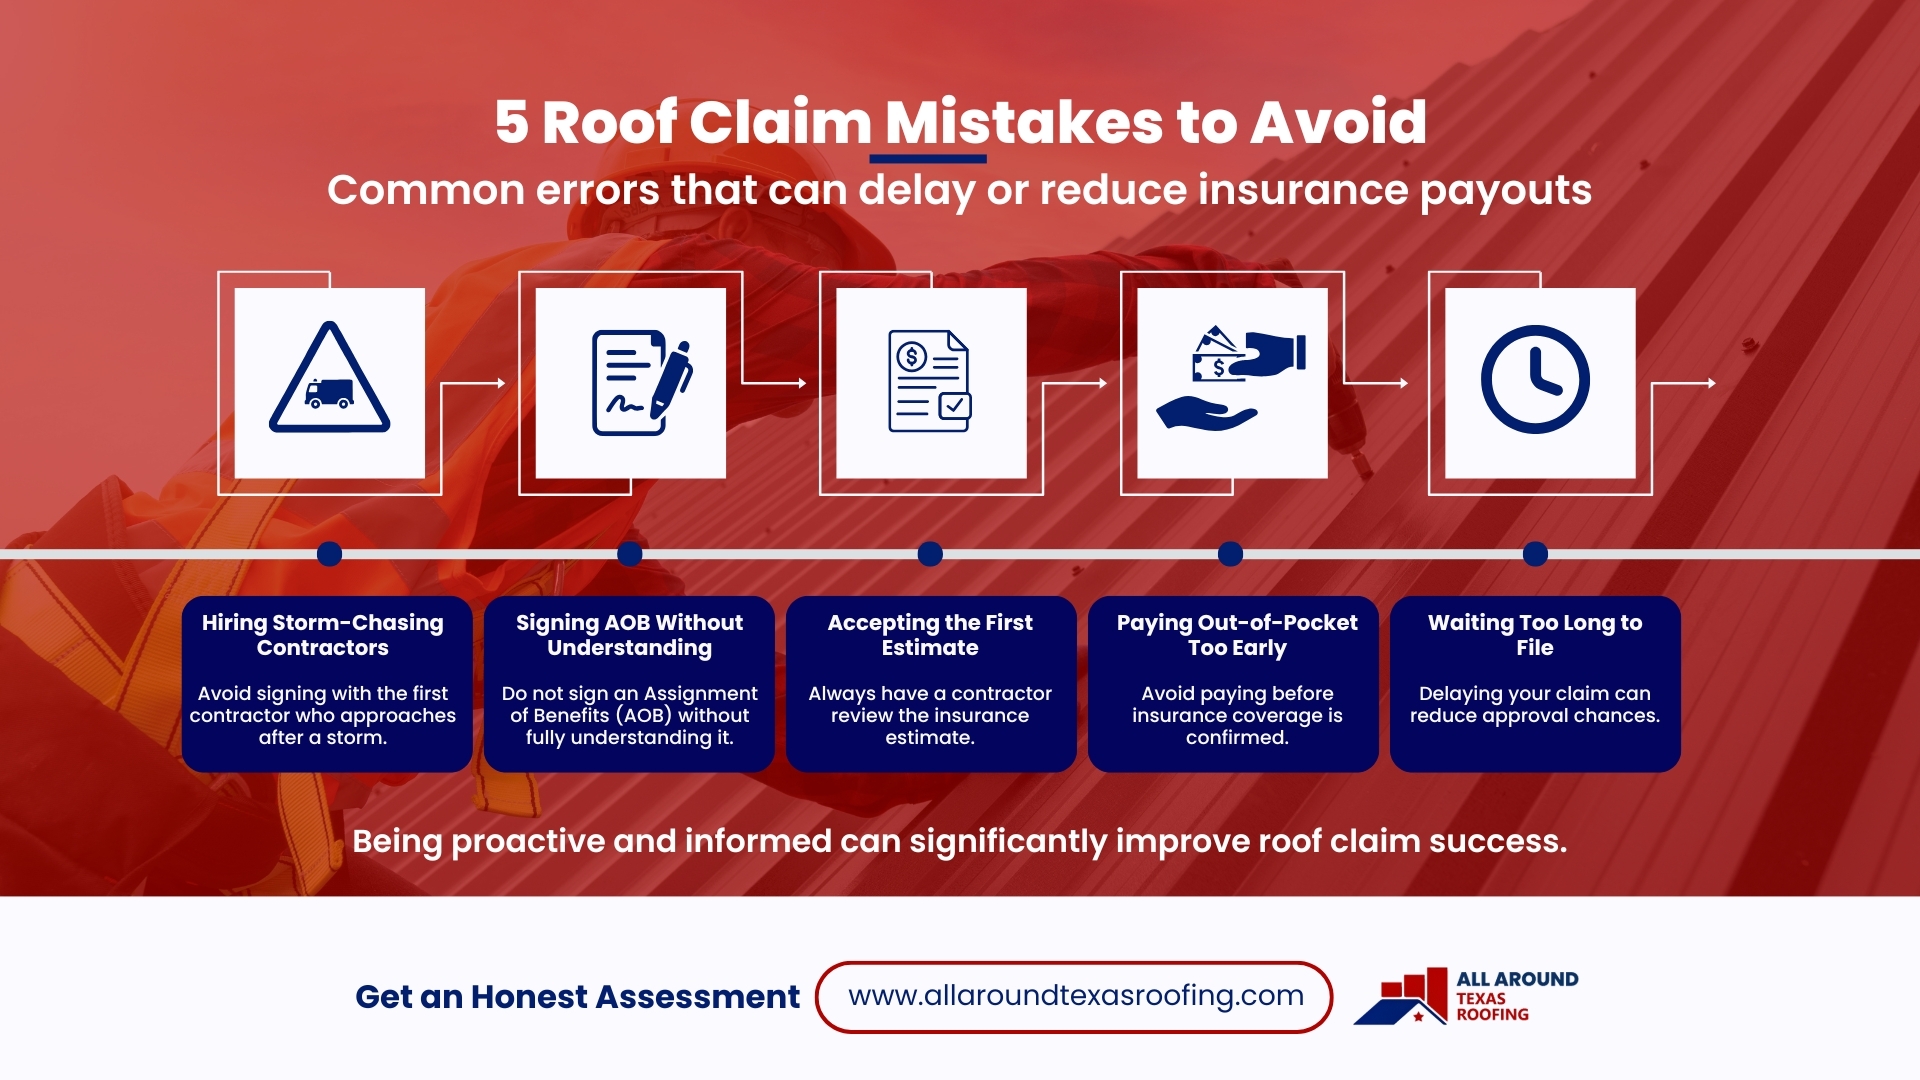
- Signing with the first storm-chasing contractor who knocks on your door
- Allowing an Assignment of Benefits (AOB) without a full understanding
- Accepting the first estimate without contractor review
- Paying out-of-pocket before coverage is confirmed
- Waiting too long to file
Being proactive and informed significantly increases claim success rates.
What Happens If Your Roof Claim Is Denied?
Claims can be denied for:
- Wear and tear (not storm-related damage)
- Lack of evidence
- Filing outside policy timeframe
- Prior unrepaired damage
If denied, you can:
- Request a re-inspection
- Provide additional documentation
- Hire a public adjuster
- Consult legal counsel (if necessary)
Denial does not always mean the end of the road.
Final Thoughts
Filing a roof insurance claim in Texas doesn’t have to be confusing or stressful when you understand the process. The key is preparation, starting with a professional inspection, staying organized, and having expert guidance during the adjuster meeting. Many claims are underpaid simply because homeowners don’t know what to look for or what they’re entitled to.
Taking the time to review estimates carefully and submit supplements when needed can make a significant difference in your outcome. Most importantly, don’t rush decisions after a storm. With the right contractor and a clear plan—like working with All Around Texas Roofing—you can restore your home properly and ensure your insurance coverage works the way it was designed to.